Week 6 Assignments
This is a fun assignment that I have done every year with very few problems.
Blow up project
You will be taking a picture of good quality that you will blow up to about 15 square feet. Senior pictures or the dream vacation or yellow car pictures work well. Make this something you would not mind keeping.
File>open
Choose a new picture.
Go to View>Extra>Show>Grid
Follow this new and improved step by step--
1. Open a new picture.
2. Open a new work space--9x9 inches.
3. Click the 2 up icon on the top. Drag the picture onto the 9x9 workspace.
4. Free transform the picture to the 9x9 space. Close the original picture and return to One Up.
5. Go to view>Extras>Show>Grid A grid will appear on your work.
6. Reduce the opacity of your picture.
7. Use the selection tool--rectangular selection tool.
8. Select the first set of three by 3 squares.
9. Edit>copy
10 File new---8x8 inches (this is because you will be printing onto 8 1/2 by 11 paper).
11. Edit paste.
12. Free transform the section to the 8x8 size.
13. Save as 1. Later ones will be saved to 1, 2, 3, 4, etc.
14. Go back to the original. Do NOT use the move tool.
15. Take the rectangular selection area and slide the selction to the next 3x3 section and repeat the steps 9-14 above.
16. When you have completed all the pictures, open each of them individually.
17. Print. A new dialogue box will come up. Find the note that says Scale to fit media. Click the box.
18. Print the work.
19. Trim the edges of the papers. You may create a stronger picture by allowing one side to have the edge showing and then overlap the next paper on that white area. Tape your work together from the back.
20. You may display your work in the school but you MUST only display school appropriate work.
*****************************************************************************
This next one is also fun.....
The multiple picture perspective picture—
File-new-default settings
File open—choose a picture that would be good as a centerpiece for your collage.
Copy the picture to a new layer.
Free transform the picture in the new layer to a square area no more than 1/3 the size of your work area.
You will need to find four more pictures related to your original picture.
File—open a picture. Click on the picture you wish to use and the bar will be blue to show that that picture is available for you to use.
You will need to make a copy since you cannot adjust the background pictures.
You will need to free-transform some of the pictures to shrink them to a usable size.
Click the commit button--the check in the corner.
Select the picture—edit copy.
Move back to the original picture—make a new layer—edit paste.
Transform-distort. Grab the handles on the picture and shape your pictures to the shape needed for your photos.
Open a new picture—free transform to size—commit—edit copy
Paste to a new layer on the original picture.
Free transform with control to put your picture on another side of the picture. Commit
Continue adding pictures until you have five total pictures in your collage.
Name your picture
Perspective collage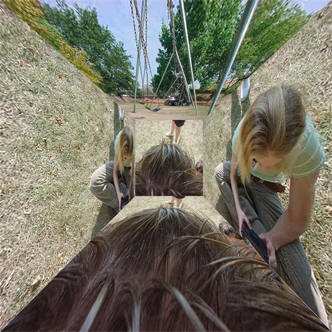
And another assignment
Graphics—panoramic photo
Note: the next version of Photoshop has a much easier way to do this but it is not really all that difficult.
Use the photos found in the file on the shared drive.
If you choose, you may take a chair and a camera and stand in one location. Aim, take a photo, move to the right 1/8 turn. take another photo slightly overlapping the previous photo. Do this at least 6 more times in the same manner. Try to have each picture’s left side slightly overlap the area of the previous picture.
Go to file, automate, photomerge
Choose a style of photomerge you would like.
Go to browse, find your pictures that are in order--click the top one, hold the shift key, click the bottom photo, and ok. Then sit back and watch the show as the photos merge into one long photo.
Call the completed work
PanoramaYour result should be one long picture
******************************************************************************
The Cupboard
Take this picture of a cupboard and put it on your work screen as your background layer.

Then, go out on the internet and find things to put in your cupboard.
Be sure to remove backgrounds and make the objects look as real as possible in
their new settings. Call this
magic cupboard. (Try to have at least 10 objects of different sizes that
represent you and your interests.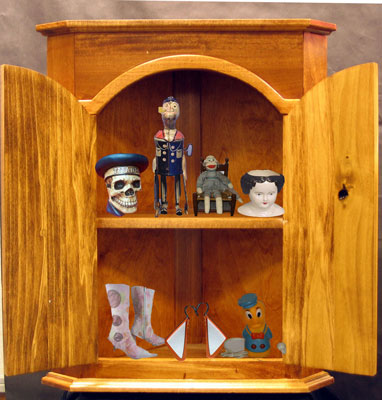
This is a good example.
This project is based on the Joseph Cornell Box. Go to this website and view his work and maybe even create a box. Materials are there. http://www.josephcornellbox.com/
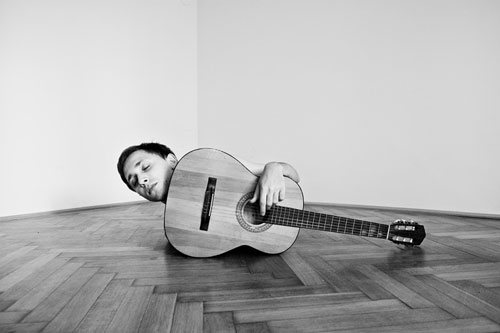
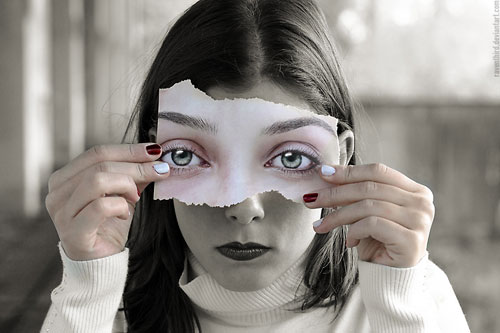
Create a surrealistic representation of a
surrealistic picture. Put together several elements in such a way that,
even though the whole idea is totally lacking in any chance of being realistic,
the picture seems real. This can be done by doing such things as using
several layers and making some of the objects larger or smaller than they would
actually be in reality. For ideas, go to
http://www.designyourway.net/blog/inspiration/amazing-examples-of-surreal-photography-39-photos/
Call this Surrealistic
Other examples may be found on the internet by search ing
the internet by searching for the work of Salvador Dali.
Please note these examples taken from the website:
ing
the internet by searching for the work of Salvador Dali.
Please note these examples taken from the website: