Note to myself: http://desktoppub.about.com/od/creategraphics/a/how_to_draw.htm
We will be doing two assignments using paint.
The first will be the creation of a house in perspective using the paint program. We will be doing this together to get the basic house and then you will be doing the completion of the house and decorating it to your personal style. Below is a rough example:
The second will be the creation of a floor plan for a home of your dreams You may use the rectangle or other shape tools to create the rooms for the home. Use the eraser to create openings and the line tool to create specific types of doors. Use the text tool to create labels for the rooms. See below a very rough example of what I have in mind. Please consider such items as access to the various rooms without going through other rooms. There must be two means of exit from every room such as a door and a window. Call this Floorplan
   |
NEW This one is a new assignment. Copy one of the pictures below--yes, I know that they are just lines or something but make a copy of one of the pictures. Then, using the basic line or whatever is on the picture as your basis for your work, Then, create a composition--using that "whatever" as a start, continue to create the composition. Call this SQUIGGLES.
Finish all work started previously.
Go to Microsoft Word.
There are several capabilities of the program related to the artistic areas. We will be exploring those areas.
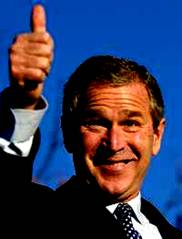
1. Open a new document. Insert>picture>from file Insert a picture of an object. Click on the picture and use the handles to reduce it in size. Then, copy and paste the picture six times on one sheet. Click on one picture and note the picture toolbar. Go to the contrast tool and change the contrast on 5 of the six pictures. Consider contrast settings of +40, +30, +20, -10, and -40. Call the work Contrast.

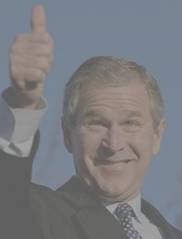
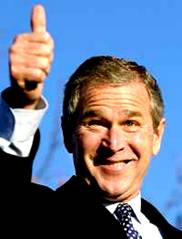

2. Start again with six pictures. This time, change the brightness of the picture by using the brightness tool. Consider the same numeric settings as those used in project number 1. Refer to the work as Brightness.


3. As a part of the sections for contrast and brightness there is a picture corrections box. Follow this path--click the picture>the pink picture and format tools tabs will come up>go to the adjust box>click on one of the adjustments>at the bottom of the dialogue box you will find>pictures corrections options.
Click the
picture corrections box and you will see one section called recolor picture.
You may also access that by going to the recolor section listed just under the
brightness and contrast information on the left end of the ribbon. Make
six copies of the same picture--such as your student picture. Recolor your
picture differently for each picture. Call the set of pictures
RECOLOR.
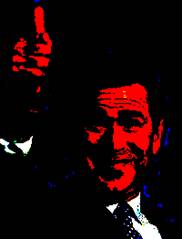
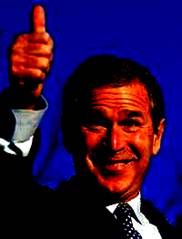
I'm really excited--I just found a new tool under the recolor section. Create six copies of the same picture and go to the recolor area. On the first row create three variations of the picture by going to the dark variations. On the second row create three light variations. Call this Dark and Light
Even more exciting is the little tool listed under recolor which is listed as the last choice under color modes. Call this black and white.
Create a set of four photos--all the same. Under recolor, there is a tool called the transparency tool. This tool will make all areas of the picture with the same color disappear. click on each of the pictures in a different location to see the shade for that area disappear. Call this set of pictures, TRANSPARENT
If you continue to move to the right, you will find picture styles. Create a set of 4 copies of one picture put on one page. Click on each picture in turn and try a different picture style for each of the four pictures.Note the various styles available for your choosing. Call your pictures PICTURE STYLES
Create a set of 4 pictures and click on picture shape. Choose a different shape for each picture. In an effort to save some effort, after you have created your set of shapes, click on picture borders. Create a different border on each picture. Call this Picture shapes and borders.
3. Do the same thing again and this time and crop the picture so you get six different pictures out of the same picture. Call this Crop
Assignment 3.5--I just was messing around with your assignments and realized that several effects could happen on one picture. In an effort to give you this same fun experience, I'd like for you to set up four copies of the same picture. On those pictures, apply as many different effects as you can. For instance, try some shapes, some borders, some border effects, brightness and contrast adjustments, some transparency--Make this interesting and have some fun. Call this--Messing around.
Here is an example:
4. Go to the text wrapping tool--the one with the little puppy. You will need to find a document that is already done. Insert seven pictures into the document. Each picture should be inserted in the fashion of one of the options in the wrapping tool. Refer to this as Word doc
5. Create a set of pictures--at least six--in which you will stretch and shape the pictures by pulling the middle handle bars. An example would be to stretch a 2x2 picture to 2x6 inches. Call the work stretch and shape.
6. Create a set of 50 different versions of your name. Vary the fonts, the font sizes, the colors, etc. Call the work My Name.
7 Open a new document and go to insert>word art. Create at least three versions of your name using the different forms of word art. Call the document Word Art 1
8. Now, for the Wowie. Create a word art picture in which you use a word for an item such as a house or a flag or love in which you have the opportunity to find a picture that would illustrate the item. Save the picture. Then, click on the word art so you get the handles around the words. Go to the word art format bar, which should have popped up when you clicked on the word art, and go to the block for format word art. There will be several tabs. Go to color and lines. The color swatches will appear but there will also be a box that says fill effects. Click on that box and there will be new tabs. This time click on picture. Choose a picture from you selection of pictures. Click ok and ok and your picture should become the fill effect for your word art. Call this one WOWIE
11. Create 4 more examples of word art on one page and use five different fill effects on the different examples. Call this fill effects.
12. Take your word and click on the box that will change the word to a vertical presentation. Call this vertical.
13. Create another word art presentation. Using the format word art box click on the box. This will give you a set of tabs with one that says color and line. Stay there and click on the transparency to get to 40% transparent. Call this 40%.
14. Create a new word art. Copy this four times. This time, go to the box on the word art tool bar that says word art shape. Click on a new one for every each of the four samples. Call this word art shape
15.I forgot this earlier but here goes. Find a picture and insert it in word. Make four copies. Then, on the picture toolbar, go to the second icon from the left. Click on it and a menu will appear with four color options. Use each of the first three on each of three separate pictures. On the fourth picture, pull the picture to the size of the piece of paper and click the washed out effect--also called the watermark. Call this Watermark
16. Create a word art. Make four copies on one sheet. Go to format>color and lines>and then click on fill effects. Choose gradient and fill each of the words with one gradient fill effect.
Call it Gradient.
17. Do the same as above but this time use pattern for your fill effects. Don't forget to add background. Call your set of four pictures Pattern.
18. Do the same as above, but this time use the texture tab. Call this set of four pictures with texture--Texture.
19. Move to the top of the page and go to insert. Click on insert shapes. You will now receive a menu of many different types of shapes. At the top of the page to the oval and rectangular shapes icons. Create a collection of about 5 of the shapes. Fill them with color. call this color shapes.
20. Using the same 5 shapes as above fill them with the gradient fill effect. Gradient Fill
21. Go to the auto shapes menu and choose about five of the shapes. Fill those with the texture fill. Save as shape texture fill.
22. Take a new screen. Create an art work in which shapes are stacked on top of one another. Each shape should have a separate fill effect. Call it Shape Fill Example: see the green picture above.
23. Go to the auto shapes icon. Find several shapes you would like to include in a design. Place at least 5 of the shapes on a sheet or more of design. Then, go to the three 3 style box and apply the 3D effect to your shapes. Some will not work. Call it 3-D auto shapes. You may add fill items and other colors. While you are at it, go to the shadow style box and give the shapes different light effects.
24. Create a set of 37 pictures. Have the first picture as your model of the picture you started with. Pair up your pictures so you will be able to do two pictures in each of the areas with which you will be experimenting. On the ribbon above the workspace for word, look at the ribbon for formatting your pictures. After the set of pictures, there is a list of three items. Click the bottom item on the list--picture effects. There will be a pull down menu. Click each item in order and create three examples from each item on the list. They must be in order. This exercise will count 200 points because of the number of items created. Call this Picture effects.
For even more variety in the picture effects, go to the bottom of each box of choices and click on the items such as "more 3-D options. This will give you even greater variety and some excitement for this assignment.
25. JUST FOR FUN--But an assignment anyway---
Take one picture and use as many of the picture effects as possible on the one picture. Call it picture effect banquet